# Introduction
"Romgere Cockpit Arduino Lib" is an Arduino library for building "real" cockpit/panel with X-Plane and Arduino board.
This library goal's is to be easy to use for non developer who want to build a real fully working cockpit/panel with X-Plane.
I use it to build my own "cockpit", an Beechcraft Baron 58 "cockpit" (Still work in progress) :
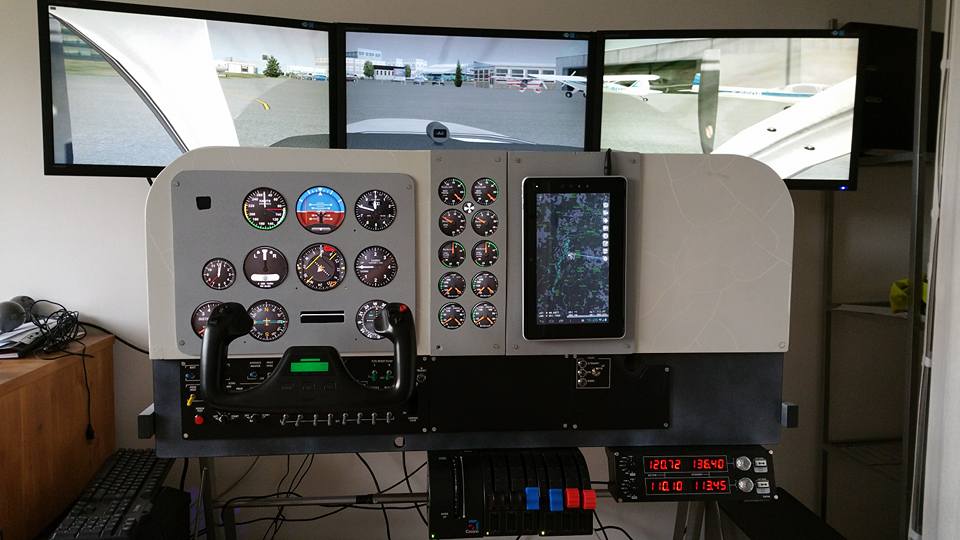 Instruments displaying is not done with this library
I wanted to share it to help other "builder" to easily focus on the build itself and not on the Arduino programing step who be can (very) boring for non developer person.
# Table of Contents
# Sample
#include <Arduino.h>

#include "src/RomgereCockpit/Application/CockpitMainApplication.h"
#include "src/RomgereCockpit/CommunicationInterface/EthernetInterface.h"
#include "src/RomgereCockpit/ArduinoControl/AllControlInclude.h"

CockpitMainApplication  *cockpitApp;
EthernetInterface       *ethernetInterface;

void setup()
{
  //Create & start Ethernet interface + Create app with our Eternet interface
  byte arduinoMAC[6]  = { 0xDE, 0xAD, 0xBE, 0xEF, 0xEA, 0xED };
  ethernetInterface = new EthernetInterface( 49001, 49000, { 192, 168, 1, 97 }, arduinoMAC, { 192, 168, 1, 21 });
  cockpitApp = new CockpitMainApplication( ethernetInterface);

  //Gear toggle switch on PIN 44
  cockpitApp->RegisterInputControl( new ArduinoToggleSwitchControl(44),
                                    new XPlaneSimpleCommand("sim/flight_controls/landing_gear_down"),
                                    new XPlaneSimpleCommand("sim/flight_controls/landing_gear_up"));

  //Gear Indicator on PIN 32, 34, 36 & 38
  cockpitApp->RegisterOutputControl( new ArduinoLEDControl(32,0),
                                     new XPlaneInputData(67, 0));
  cockpitApp->RegisterOutputControl( new ArduinoLEDControl(34,0),
                                     new XPlaneInputData(67, 1));
  cockpitApp->RegisterOutputControl( new ArduinoLEDControl(36,0),
                                     new XPlaneInputData(67, 2));
  cockpitApp->RegisterOutputControl( new ArduinoLEDControl(38),
                                     new XPlaneInputData(67),
                                     inTransitGearManageFunction);
}

//Transformation function for "Gear in transit" indicator
//All gear down (1) or up (0) => turn off (return 0), turn on (return 1) otherwise
float inTransitGearManageFunction( float *val){
  return (( val[0] == 1 && val[1] == 1 && val[2] == 1 ) || ( val[0] == 0 && val[1] == 0 && val[2] == 0 )) ? 0 : 1;
}

void loop()
{
  cockpitApp->Loop();
}
This sample come from Sample0.ino (opens new window) file. Find more example in "example" folder (opens new window)
For more example, please see "example" folder.
# Prerequisites
This library is design to work with an Arduino board (test with Arduino UNO and Mega) and an Ethernet Shield.
Of course you need X-Plane (test with X-Plane 10) and somes hardware stuff (LED, button, toggle switch) to use with the Arduino board for interacting with your favorite flight simulator.
And that's all ! This library has no other dependency.
# How it works
X-Plane is able to send various data of the flight through the Ethernet network and can also received command from other X-Plane instance or other device with same method.
An Arduino board with an Ethernet shield can receive and send data through the Ethernet network.
This library is able to parse/send datas or commands from/to X-Plane when runing on the Arduino board. On the other hand, it provide an high level interface to bind datas/commands with components pluged to the Arduino board, without need to understand how the receiving/emiting process works.
# Use the library in your own sketches
So you want to use this libray in your own sketches ? Simply follow there 3 steps :
- Create an
srcfolder in your Sketch folder (the folder who contain your main.inofile) - Copy (or create simlink) the
libfolder of this library and name it "RomgereCockpit" - Include the library file(s) you need with
#include "src/RomgereCockpit/_file_you_need_.h".
Tips: You can change the name of "RomgereCockpit" folder by whatever you want, just change it too in the #include path
# X-Plane configuration
Go to the Settings -> Net Connections menu in X-Plane and then to the Data tab. Enter your Arduino address on the input below "IP for Data Output" section :
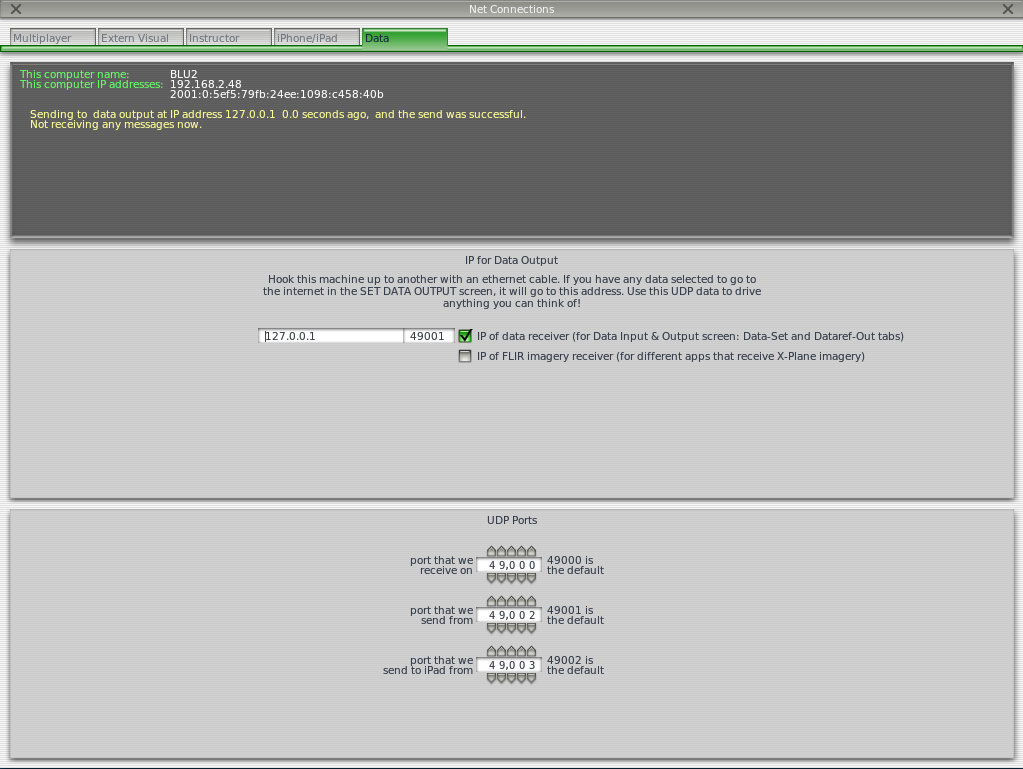
Keep in mind the "receive on" and "send from" port (you can also change them).
Go to the Settings -> Data input & Ouput menu in X-Plane. Check "internet" checkbox on the top right of the screen and then select the first checkbox of each data you want to send through network to the Arduino board.
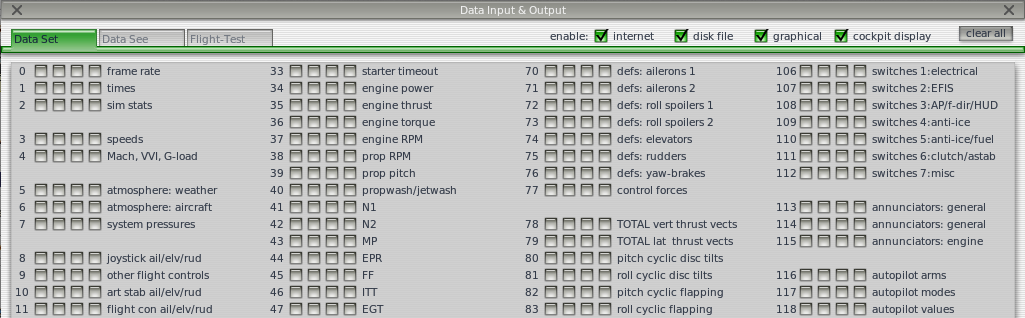
Note : Step n°3 is optional if only use the library to send command to X-plane (not received any data).