# X-Plane command (ouput) and data (input)
The library use 2 classes to manager exchanges with X-Plane :
- "X-Plane commands" : Allow library to send datas to X-Plane (key, command, dref, data). An "X-Plane command" should be bind to an input control. The library goal is to provide 4 types of commands :
XPlaneKeyCommand: Send a key to X-Plane (just like if you pressed it).XPlaneSimpleCommand: Send a simple commands like "sim/radios/com1_standy_flip".XPlaneDATACommand(not implemented) : Send X-Plane Data.XPlaneDREFCommand(not implemented) : Send DREF data.
- "X-Plane input data" (aka
XPlaneInputDataclass) : Allow library to read datas from X-Plane and bind it to an output control.
# Input data
The XPlaneInputData class goal is to reference which data (group number and value index) as to be bind to an output control.
A "group" is a set of data send by X-Plane, it contains 8 float parameters (8 float values). You can easily find a group number on X-Plane interface when you configure which data as to be send to the library :
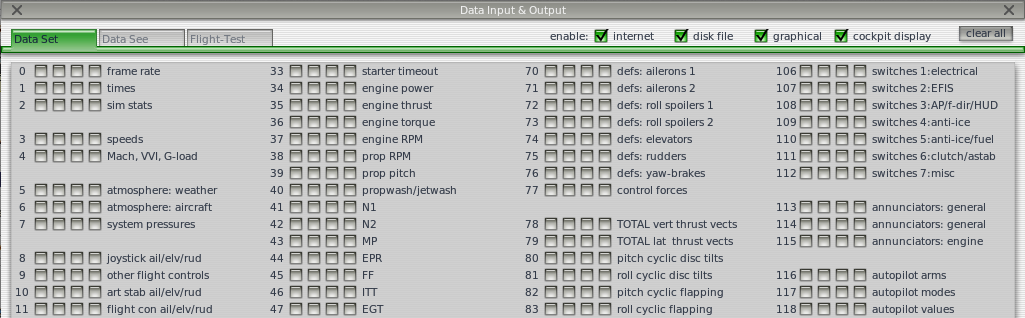 The group number is the number on the left of group name (eg. "speeds" is will be send to library with number 3).
The XPlaneInputData class take 2 arguments :
XPlaneInputData(byte group, uint8_t index = 0)
Arguments definition :
byte group: Group number to use.uint8_t index(default: 0) : Index (in group) of value to use.
# Value (in group) index
As say below, an group is composed of 8 float values, so if you want to bind a data to a LED, you have to choose one of these 8 value. It's the role of the index argument of XPlaneInputData class.
To easily find which index you had to used, you can display a group informations on X-Plane screen to "debug" group's data. Example for "landing gear deployment" (group n°67):
 Enable the first checkbos (n°1 on image) to send group on UDP (to Arduino board) and last checkbox (n°2 on image) to display group datas on screen.
Here is the result of displaying the data of group n°67 on X-Plane screen (for Beechcraft Baron 58) :
 The 3 first values (in red) are the state of the 3 gears of the plane (in this example the 3 gears are down).
Each float value represent the deployment of one gear (First float : Nose gear deployment. 0 : gear UP / 1 : gear DOWN). So if you want to use a LED to indicate the nose gear deployment, here is the sample code :
#include "src/RomgereCockpit/Application/CockpitMainApplication.h"
#include "src/RomgereCockpit/CommunicationInterface/EthernetInterface.h"
#include "src/RomgereCockpit/ArduinoControl/ArduinoLEDControl.h"

CockpitMainApplication  *cockpitApp;
EthernetInterface       *ethernetInterface;

void setup() {
  ethernetInterface = new EthernetInterface( ... );
  cockpitApp = new CockpitMainApplication(ethernetInterface);

  //Declare and bind control with data
  cockpitApp->RegisterOutputControl(
    new ArduinoLEDControl(8), //Create LED Control on PIN n°8, bind it to
    new XPlaneInputData(67, 0) //Use first data of group n°67 (nose gear indicator)
  );
}

void loop() {
  cockpitApp->Loop();
}
# Transformation function
If you want to use all the values in the group to define the state of the control you have linked to a group, the library can take a callbak function named "transformation function" when you register an "input data" to control.
The "transformation function" goal is to transform all values of single group in one float value. This single float value will be send to define state of a control.
For more information please see transformation function documentation page.
# Output command
The "X-Plane commands" classes define which action will be done when a control's state change.
There is 4 types of "X-Plane commands" (only 2 are currently implemented).
# XPlaneKeyCommand
Send a key to X-Plane (just like if you pressed it).
The XPlaneKeyCommand class take 1 argument :
XPlaneKeyCommand( const char c )
Argument definition :
const char c: The key to send to X-Plane (eg. 'P' : for pause)
Example:
#include "src/RomgereCockpit/Application/CockpitMainApplication.h"
#include "src/RomgereCockpit/CommunicationInterface/EthernetInterface.h"
#include "src/RomgereCockpit/ArduinoControl/ArduinoPushButtonControl.h"

CockpitMainApplication  *cockpitApp;
EthernetInterface       *ethernetInterface;

void setup() {
  ethernetInterface = new EthernetInterface( ... );
  cockpitApp = new CockpitMainApplication(ethernetInterface);

  //Declare and bind control with command
  cockpitApp->RegisterInputControl(
    new ArduinoPushButtonControl(8), //Create push button on PIN 8
    new XPlaneKeyCommand('P') //Send "P" key command to X-Plane
  );
}

void loop() {
  cockpitApp->Loop();
}
# XPlaneSimpleCommand
Send a simple commands like "sim/radios/com1_standy_flip".
The XPlaneSimpleCommand class take 1 argument or 2 arguments :
XPlaneSimpleCommand( const char* cmd, const char* cmd2 = NULL )
Argument definition :
const char* cmd: The command to send (eg. "sim/radios/com1_standy_flip")const char* cmd2(default: null) : The second command to send at the same time (optionnal).
A complete list of all command can be found on the Sim Innovations site (opens new window).
Note : the most up-to-date list can be found inside your X-plane folder, YOUR_X_PLANE_FOLDER/Resources/plugins/Commands.txt
Example :
#include "src/RomgereCockpit/Application/CockpitMainApplication.h"
#include "src/RomgereCockpit/CommunicationInterface/EthernetInterface.h"
#include "src/RomgereCockpit/ArduinoControl/ArduinoPushButtonControl.h"

CockpitMainApplication  *cockpitApp;
EthernetInterface       *ethernetInterface;

void setup() {
  ethernetInterface = new EthernetInterface( ... );
  cockpitApp = new CockpitMainApplication(ethernetInterface);

  //Declare and bind control with command
  cockpitApp->RegisterInputControl(
    new ArduinoPushButtonControl(8), //Create push button on PIN 8
    new XPlaneSimpleCommand("sim/annunciator/test_all_annunciators") //Send "Test all annunciators" command to X-Plane
  );
}

void loop() {
  cockpitApp->Loop();
}
# XPlaneDATACommand
Send X-Plane Data. This type of command is not yet implemented)
# XPlaneDREFCommand
Send DREF data to Xplane including a float value depending on input control bind to the command.
Example of DREF "cockpit2/controls/parking_brake_ratio[0]".
The XPlaneDREFCommand class take 1 argument:
XPlaneDREFCommand( const char* dref )
Argument definition :
const char* dref: The dref to send (eg. "cockpit2/controls/parking_brake_ratio[0]")
A complete list of all command can be found on the Sim Innovations site (opens new window).
Example :
#include "src/RomgereCockpit/Application/CockpitMainApplication.h"
#include "src/RomgereCockpit/CommunicationInterface/EthernetInterface.h"
#include "src/RomgereCockpit/ArduinoControl/ArduinoPotentiometerControl.h"

CockpitMainApplication  *cockpitApp;
EthernetInterface       *ethernetInterface;

void setup() {
  ethernetInterface = new EthernetInterface( ... );
  cockpitApp = new CockpitMainApplication(ethernetInterface);

  //Declare a potentiometer on analog pin n°5 and bind it to a DREF to manage parking brake ratio
  cockpitApp->RegisterInputControl(
      new ArduinoPotentiometerControl(5),
      new XPlaneDREFCommand("cockpit2/controls/parking_brake_ratio[0]")
  );
}

void loop() {
  cockpitApp->Loop();
}